Total Pageviews

Sunday, June 17, 2012

Body - Gluing the roof back on - Part 3

Now that I have completed fibreglassing of all the roof parts back together again, the next stage is to finish those joints.

You have to do this because bare fiberglass doesn't provide a good enough finish for paint to go straight over the top.

When new fibreglass comes out of a mould it has a gel coat finish, this is basically a fibreglass resin based paint that has a smooth glossy finish (you may remember me showing you this in an earlier blog Body - Goes into the mould) this glossy finish can be lightly sanded, primed and painted.

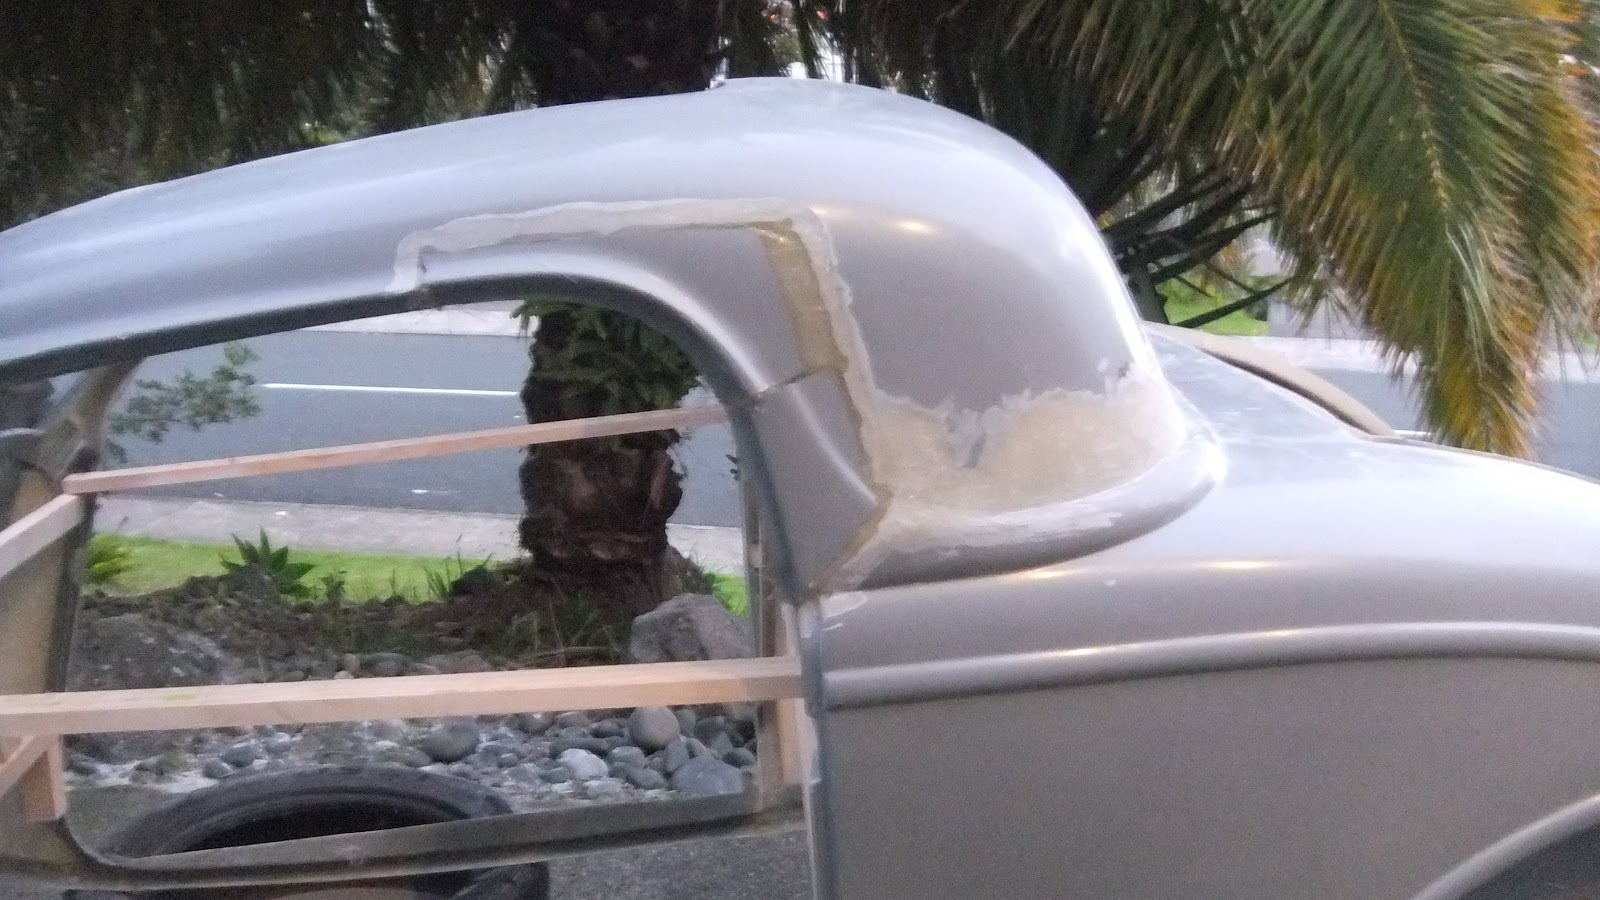
But........when you start griding into that gel coat finish as I have had to do, to make all my joins for the roof chop, you end up going down into the fibreglass itself and you start exposing the fibreglass fibres themselves and when sanded they make all these furry little ends that are porous. Here is a close up pic (double click on it). All the white spots are those fibreglass thread ends. There are also some air bubbles.


To overcome this I have ground all the joins slightly below the finished gel coat level (the finished surface) and will add a filler to bring it back up to the finished level and at the same time cover the fibreglass ends and air bubbles while providing a nice finish for the primer and paint. This is also often referred to as bogging!

I will be using this Epiglass HT450 filler powder. Thanks Mum and Dad, this is where my birthday money went :-)

This is amazing stuff, it is actually tiny little sphere's in fact they are sometimes referred to as "micro balloons" and they are very, very light. You pick up a scoop of these and it feels like you have nothing in the scoop and whats more they behave like a fluid, they pour like water and when you put them in a container you can swish it around just like a liquid.


Now obviously we can't just spread these straight on the car, they'd fall off and blow away. So we need a few other tools and ingredients.

The other beautiful thing about this filler is it mixes with the same resin I have been using with the fibreglass which means it bonds nicely to the layer of fibreglass it is being applied to......so that is the other main ingredient....resin.....oh and of course the hardener for the resin.

The other things in the picture below are the tools I will use......
  • 2 litre icecream container for mixing the resin and adding the filler powder
  • Resin and hardener
  • 2 flexible metal spreaders for applying the filler
  • A filler board used for carrying the filler on and to load up the metal spreader
  • 2 different grades of sandpaper
  • 2 different sanding longboards
(Thanks to Russell for giving me a loan of the spreaders, filler board and longboards)


Now that I have everything ready it was a case of mixing the resin and adding the filler powder.

I found that 5 drops of hardener per tablespoon of resin worked best and gave me enough time to get the filler onto the car before it set. This is more hardener than I used compared to when I was fibreglassing and that was largely attributed to the very cold weather we are having at the moment. The area I use for working on the car outside is on the cold side of the house with no sun and the temp hasn't been much above 8 degrees C (or about 45 degrees F for you Kevin). By adding more hardener though it helps speed up the reaction time and help the filler to set properly.

I used 5 tablespoon of resin with 7 tablespoons of filler powder to get a nice soft icing like filler. At this consistency it was easy to spread and it stayed on the car which is a good thing of course. Here you can see what I mean by it being like icing. Mmmmm so good you could eat it!


Now I have to say I was particularly disappointed with my ability at this point. The finish I got was nowhere near as good as what I had envisaged in my head.....so haven't taken too many pics. That said I am not worried as the finish is in the sanding, not in the filling. So long as you put plenty on you can always sand it back to the desired level and shape. 

After some of the filler hardened I had a wee try with the longboards and tried to sand a bit. Here's what it came up like without too much effort. Don't look at the edges they will still need to be sanded, and ignore the wee pockets and bubbles, that's just because I have sanded deeply enough yet, but you can see how nice and smooth the filler has come up in the centre of the picture. Quite pleased really so I can't wait to get stuck into sanding on the next fine weekend we have.


Meantime though, its back inside so the filler can go nice and hard over the next few days.


Damn that resin smells good. I can even smell it upstairs in the house as I write this blog. I think I could get quite addicted.

Sunday, June 3, 2012

Body - Firewall

Another part that will need some serious modification is the cowl and firewall. This is for several reasons.....

Firstly the sleek look that the speedstar coupe has is contributed to by the fact that the bonnet or hood runs all the way from the grille right back to the doors on the side and right back to the windscreen on top. It will look like this one.


Now compare that to the original car where the bonnet stops about 6 inches or so before the doors on the sides.....then on the top you can see there is a big "V" shape in the cowl that the bonnet meets up with. There is nothing wrong with that except it does detract from the more sleek look in the first pic. Its pretty subtle but it is these subtleties that give the overall sleek look. So because of that I need to make a bit more work for myself.


Now there are two more reasons I need to rework the cowl and firewall. The first one is fairly straight forward....I want the wipers to park down below bonnet line like this. Again this helps to streamline the car and make it more like the first picture above. The funny thing is the car in that top picture cheats as it doesn't even have wipers. Its a California car and it rains so infrequently over there that wipers aren't mandatory, or at least I hear thats why they get away with it. I will definitely be having wipers though, cause it always rains in Auckland and to achieve the same sleek look I need to extend the windscreen below bonnet line so the wipers can tuck down underneath when they are in the park position.


The last reason is because I will be using part of the firewall as an air box for the engine air filter and induction. You will recall from an earlier blog Engine - Intake Manifold Modifications that the engine will now suck air in from the back rather than from one side. So the intention is that all this ugly induction stuff will be tucked away inside a box in the firewall and that box will have vents like you see on a normal car where the wipers park, that will allow it to suck in air from below the windscreen. 

Actually I learnt something about this recently. Have you ever seen those 70's Camaro's that have their air scoop on the bonnet pointing backwards with the opening up against the windscreen? You'd think putting the scoop on the other way around with the opening at the front "Scooping" the air world work better right? Well actually, no...... with those backward facing ones, they benefit from an area of high pressure. The wind hitting the windscreen has to go somewhere. Yes some goes to the sides and some over the top of the car, but some is also forced downwards into that rear facing scoop. I am hoping that I will also get the benefit of this forced air with my rear facing intake manifold.

You will also recall I am making an Engine Cover. The idea being that this will butt up to the firewall and help to conceal all the induction plumbing.

So yes I need to modify my firewall. Below is a picture of what I hope it will look like once done, but I still haven't quite planned out how the air box will work as it will need to have everything inside it but I will still need to be able to get in there to change and service the air filter of course. Anyway a bit more thinking on that before I hopefully arrive at something like this.


....and that is a long way away from the original one. 


So there is only one thing for it. Cut the cowl off!


Now while I have the cutoff disk at hand I also want to cut off the lip on the back of the car. It looked like this.


But now looks like this.


This will give a nice line from which to run the boot floor down to the diff. It will hopefully look as good as this one day.


As an aside Bob & Freda called in to see how the Coupe was progressing.....here are a couple of shots of their 32 Coupe. It really gets you motivated seeing a finished car like this! Thanks for calling in Bob & Freda.


Saturday, June 2, 2012

Body - Gluing the roof back on Part 2


You might remember from the first blog about gluing the roof back on that when you join fibreglass you can't just glue the two cut pieces together. Instead you need to hollow out the cuts from behind, fill them with fibreglass, then hollow them out from the front and fill them with fibreglass again. 

By doing this rather than a weak join like this where the only glue would be on the join.....


......you get one like this where there is fibreglass over a much wider area on both the front and back face of the join. In fact the actual join is not even visible anymore. This is much stronger and most unlikely to crack.


So here we have it, this is what it looks like outside the body body now. I have ground out the join from behind and filled it with fibreglass. Now I am ready to grind out the front side of the join.


Here it is a bit later once I have ground it.


And a close up......you will be hard pressed to find any hint of a join now. Now it is all ready to fibreglass.


Here we have it, many hours later. Looking good.


You will remember in the last blog too that I needed to recreate the A Pillar because it looked like this after the chop.....a bit of alignment required.


Well here it is just after I had fibreglassed the outside.


And here it is after I had knocked it back with the grinder ready for finishing with body filler.


The next major adjustment is to sort out the B pillar. Now this one needs a bit more thought and its all to do with the wind up window that rolls up and down inside the door. Look at this next picture. This is what the original door was like. It is this shape for a reason and note there is a frame that the glass sits in when the window is up.


In this next picture you can see what goes on inside the door. The glass slides up and down in two tracks and there is room in front of the tracks for the door latch mechanism and behind the track on the right hand side for the door hinges.


Since I have done the roof chop though there is a real problem. See if you can work it out from this next picture. Now bear in mind too that the new doors won't have a frame for the glass to sit in....they are what is known as pillar less doors. Can you visualise the problem.


In effect this is what the door opening looks like at present.


Let me explain what is wrong with this using this next picture. 
The dotted line represents where the glass would need to travel when the window is being wound down. This isn't going to work. The glass can't go down where there is no door...it just won't work.


So what I need to do is shift the B pillar forward so that the door opening looks like this. As you can see the glass is not as wide and doesn't go beyond the back of the door anymore. This will enable it to go down inside the door on a track.


So here is that change on the actual body.
Firstly mark out the B pillar where I am going to cut it out.


Make the cuts and remove the B pillar pieces.


Shorten and remodel the B pillar pieces so that they fit back together again, but note they are much further forward now and there is a step where the bottom of the window opening meets the top of the door. Now that its all taped up I can fibreglass from inside the body.


Here it is several hours later with the fibreglass set and all the tape removed. You still probably need to double click on the picture to make it bigger so that you can see how the B pillar is stepped forward compared to the door jamb. Its not much but will hopefully be enough. If its not I'll just have to do it all again another day.

Don't worry that the nice curved swage line doesn't line up. I'll fix that with the angle grinder and reform it when I re-fibreglass the outside and will refine the shape with body filler.