Total Pageviews

Saturday, October 27, 2012

Rear Axle - Jag Rear Overhaul - Part 4

Okay more progress here, though not as fast as some might expect. In fact I have had a couple of people say they were a bit disappointed when they saw my last post about the Jag Rear go up as they thought that would be it reconditioned, reassembled and installed in the chassis.

Sorry guys its not quite that easy.

Actually working on this Jag rear its the first time I have really understood the phrase that something has been "over engineered".  I have heard that said about a Jag rear before and I certainly know why now. They are way more complicated than they need to be and there are way more components than you'd ever see on a Japanese car. The good bit though is it is all serviceable!

You see this next picture is what all the components look like when taken apart.....and this is just for one side. This is repeated for the other side of the car. Double click on the image to have a closer look.


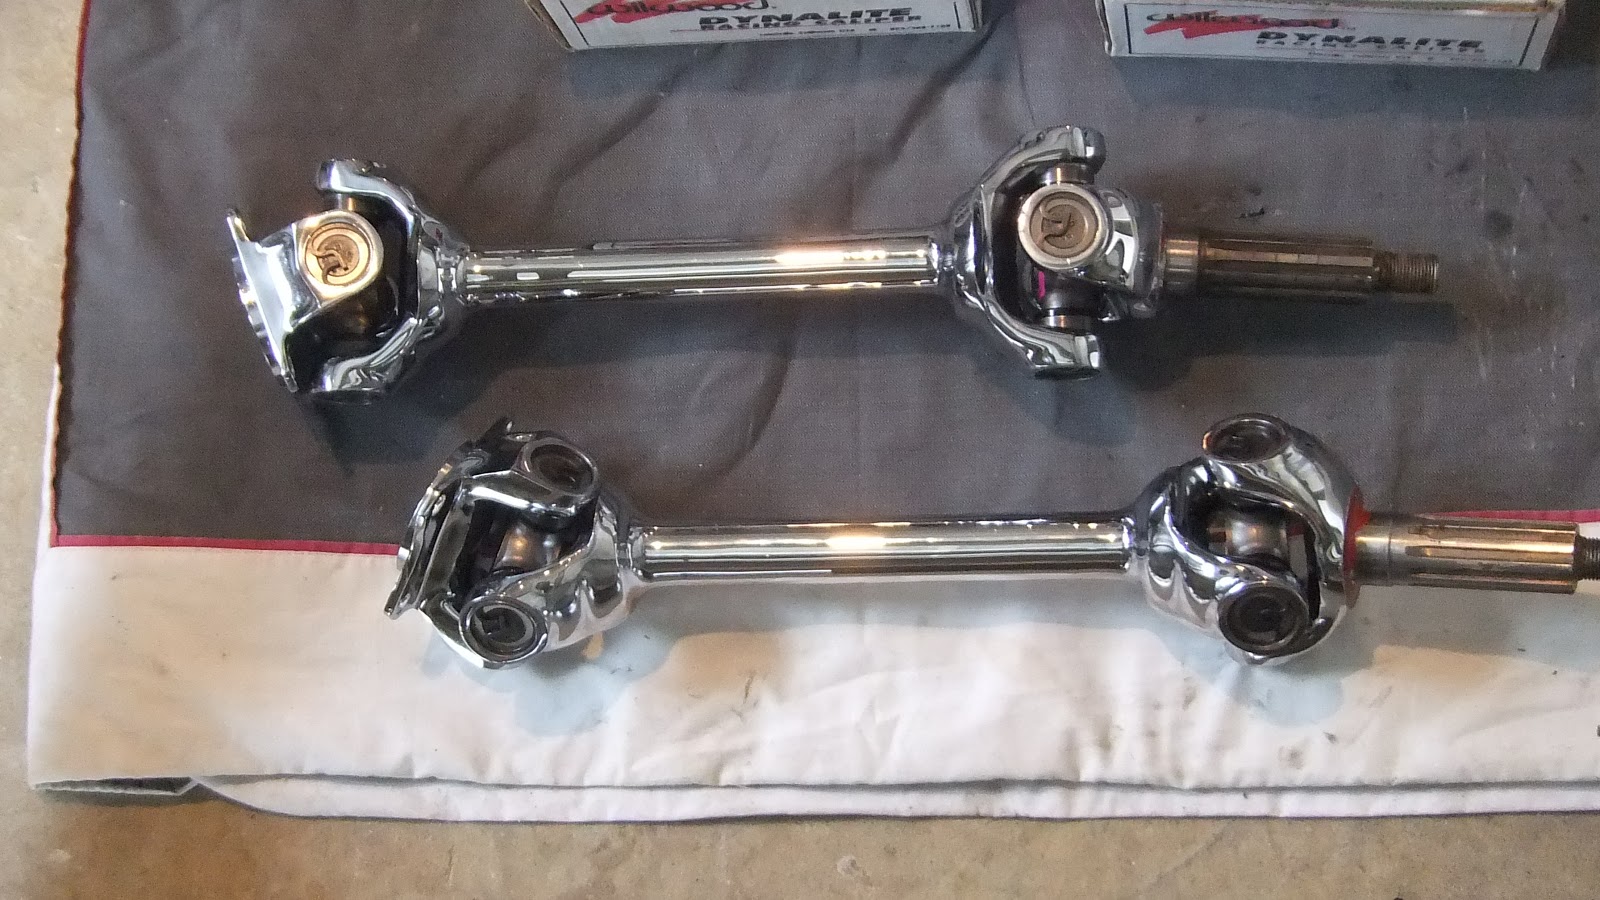
I have highlighted a few of the parts.....firstly the yellow part is the axle and universals I showed you in the recent blog. This gives you an idea of how much more there is too this back axle.

The orange parts I don't have. Instead of this spindle set up with one big wing nut (called a knock off) I will have a more common set up for attaching the wheels like any other road car where there will be 5 wheel nuts. The next picture shows the drive flange with its 5 studs for the wheel nuts.


Now back to the diagram.....The pink highlighted parts are as follows.....

1. These are just dust covers and detract from the overall look and won't be used.

2. This is what is known as the cage and it basically is a frame that the whole unit bolts into. I won't be using this either as they are bulky and ugly. Instead the diff will bolt straight up to the chassis (first picture below) and the two halves of the rear axle assembly will be tied together by the two tie bars in the second picture below.


3. The third part highlighted pink is a bottom plate that ties everything together underneath. This will be replaced by a new fancier one.


4. Last but not least the 4th part highlighted pink is a control arm. These ugly pressed steel ones will be replaced by a cleaner looking chromed control arm.


As for the rest of the bits though.....and there are about 100 of them......I needed to clean them and inspect them and decide what needs to be replaced. There are a few bits too that I will get chromed or HPC'd to protect them. If I don't they may rust. Some of the bits are barely visible but if I don't protect them they will still deteriorate and drop rust stained water if they get wet etc.

This is the bucket of bits I need to attend to.


And here we are all set to go with a basin, parts cleaning brush, a good supply of rags and Kerosene for breaking down the grease and grime.


So after about two hours of soaking, scrubbing and wiping, here are all the bits laid out.


Now I am all set to make runs to the Jag dealer to replace a few parts, HPC to get a few parts ceramic coated, the electroplater to get some parts chromed and I'll also need to source a few new bearings. That should keep me busy all week.

Now on top of that.....this next drawing shows an exploded view of the Jag diff head. My Diff head has gone across to Bill Dobbin who is going to rebuild the diff head for me. First he'll pull it apart like this diagram so I can get replacement bearings and of course have the diff head all painted up before it goes back together.


You'll se I have highlighted a part orange here too. This is the back cover of the diff head and I will be upgrading that to a more fancy looking alloy one. Thats shown in the next picture but is missing the back cover as it is getting some work done on it. I'll show you more of that later.


So there you go....still plenty to do. Sorry but it won't be getting assembled for a wee while yet, but keep watching!


Wednesday, October 24, 2012

Metals that react


You may all have seen a comment posted by a mate Adam Johnson against my last blog on the Rear axle universals.

I am looking at making aluminium caps to cover up the ugly circlips on the universals and Adam was concerned that the metals might react and give cause to ugly corrosion. I have seen this myself where Aluminium forms a nasty white powdery substance when it is in contact with other metals. I have to admit Adams comment did get me thinking, so I made a point of finding out a bit more about it.

After reading a fair bit of material I think it goes something like this……the higher the activity of the metal (faster oxidising) the more the metal will take on an increased rate of corrosion when in contact with a lower activity one. So in other words a faster rusting metal will rust even quicker if it’s put with a slower rusting material.

So what is the order of activity…..faster rusting to slower rusting?
·         Francium
·         Caesium
·         Rubidium
·         Potassium
·         Sodium
·         Lithium
·         Strontium
·         Calcium
·         Magnesium
·         Aluminium
·         Manganese
·         Mild Steel
·         Zinc
·         Chromium
·         Iron
·         Cadmium
·         Cobalt
·         Nickel
·         Tin
·         Lead
·         Copper
·         Silver
·         Mercury
·         Gold
·         Platinum

But I hear you say Aluminium is good in the elements and it doesn’t rust, so why is it toward the top of the list? Actually Aluminium corrodes very quickly, in fact as soon as it makes contact with air, but the main reason it isn’t ordinarily destroyed very quickly is a quirk of its oxidation product, aluminium oxide (aluminium rust) adheres with extraordinary tenacity to pure aluminium, so if nothing else is present, an aluminium object will last nearly forever, protected by its own oxide.

In contact with other metals though, aluminium can be destroyed quickly as Adam has witnessed in the past. This will be sped up if there is an acid anywhere nearby like sea water or maybe even rain water that has contaminants.

Apparently in the old days steel ships used to sink at sea as the sea water used to speed up the reaction between the iron rivets and the steel hulls and would literally dissolve the rivets. To overcome this they strapped a block of zinc on the hull which becomes a sacrificial anode. A sacrificial anode is a block of metal that is more reactive than the metal it is protecting. The more reactive a metal is the easier it gives away electrons. This reactive block of metal on ships acts as a source of electrons for the iron. When oxygen takes electrons from the iron during the process of rusting, iron atoms simply take electrons from the reactive metal in this case zinc, so the block of zinc corrodes and the ship and its rivets don’t.

Similarly you might think Chromium is not far down the list either so why doesn't it rust or corrode? Look again at the list though, mild steel which chrome is applied to is toward the more active end of the list, so what happens is the mild steel actually donates its electrons to the chrome. When ever you see a rusty bumper on a car its not the chrome that has corroded its the mild steel underneath.


So yes this does mean the aluminium caps I propose making for my axles could in fact go white and powdery, as they will corrode more quickly than the chrome and the mild steel they are attached to. But....is this a bad thing? Actually no and for two reasons…..its a hot rod and polishing will be regular so should protect things to a great extent but also this faster corroding aluminium will act as a sacrificial anode to the chrome and mild steel axles, so in effect, as I see it, it will stop the chrome rusting.

Now I can afford to replace a few aluminium caps if they start to deteriorate (or maybe even just repolish them), one things for sure though, that’s a whole lot cheaper than re-chroming the rear end.

Thanks Adam for raising the point it made me look into it and I know more now that I did this time yesterday! I guess only time will tell now as to whether or not I am correct in my assumptions. It must be true though I read it on the internet!

Monday, October 22, 2012

Rear Axle - Jag Rear Overhaul - Part 3

Hi all, I've been away on a long holiday in Europe so there hasn't been any activity for a while, but I guess you will have noticed that.

Anyway I'm back into it now with renewed enthusiasm and the focus is on getting the chassis rolling again as I have been asked to put the project on display at Kumeu January next year. This will be a lot easier to achieve if the whole thing is on wheels, which means finishing off the Jag rear.

You will recall I had many of the components chrome plated (so it should be a real feature of the car when done, but all that bling would be a complete waste of money if the mechanicals weren't rebuilt as well, now its time to start the rebuild/reassembly.

First up I purchased 4 universals via Peter Farrant at Auckland Balance and then had him install these. I have prepared a short video so you can see the part I am talking about, how it works and what is involved.


Now that is very simplified. The reality was quite involved. Its not easy getting press fit parts like this to come apart (thanks to Bill Dobbin for his help with that before I got all the chroming done) and a lot of patience is required when reassembling too. This was made all the more difficult by the fact that the holes where the universals get pressed into had some chrome in them. This is a problem for two reasons, firstly the tolerances are so tight that a layer of chrome means things just don't fit. Secondly chrome peels once its damaged so if the cups being pressed in broke away a piece of the chrome, that tear would just keep running and basically ruin the chrome plated finish.

To overcome this it was necessary to have the holes carefully machined to remove the excess chrome first. Then it was possible for Pete to put all the bits together. The machinist and Pete both did a fantastic job. Here is the final result. Very happy!


The next step will be to have some alloy caps machined to cover the ends of the bearing cups and the circlips. This will dress the axles up even more. Watch for an upcoming blog on this.

Oh well I should go now....potentially a big day tomorrow with the certifier coming for the first inspection and to get the build onto the certification register. I'll let you know how that all went in my next blog.