These are as follows
Aircon & Heater
One step backwards, two steps forwards
More wiring
Heater Blower Unit
Aircon Core unit
Heater Core and Airflow Control
Its a wrap
It'll be the death of me
To be honest I cannot believe how much time and energy I spent on this aircon.....it better be cold on a hot day and hot on a cold day!
Anyway, with the wiring almost all resolved the actual heater air con and heater box refurbished and adapted for plumbing of the air through the car, its time to start looking at the aircon compressor and evaporator.
The compressor bolts to the engine and is driven by the belt that wraps its way around alternator, crank and power steer. This is made of alloy so will look nice polished.
Here it is before
And after
While it was with the aircon specialists I had them take a look at its compatibility with the Celica evaporator. That's the bit that is inside the heater box that provides all the lovely cool air. It turns out the compressor runs on the new "ozone friendly" gas but that the evaporator was set up for the older gas. This has now had a new valve fitted to make it all compatible.
I also took the pulley (along with the others off the front of the engine) for polishing before then taking them to HPC to have them ceramic coated.
Here they are in their raw state.
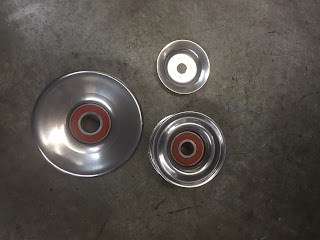
And once they had been polished ready for coating.
The good news is most of them were able to be coated and here's what they look like, but unfortunately the aircon one couldn't be done. The HPC process is a baked on coating at high temp, and the aircon pulley has a damper between the outer rim and the inner part that attaches to the shaft of the compressor. The damper is made of rubber and it would burn/melt in the HPC process.
Here's the ones that could be HPC'd. Lookin' good!
So what can I do about the aircon pulley. I thought I would have to resort to silver paint (budget chrome), but I learnt something....You can chrome plate a pulley that has rubber in it. The chemicals don't react with the rubber and there is no heat involved.
Another concern was the fact that the pulley has a clutch surface on the back of it that should not be coated/chromed.
A big win here though.....as the name suggests.....electroplating works using electricity. When they chromed the pulley they were able to charge up the front face (and chrome it) but the current didn't flow to the inner part with the clutch surface as the rubber damper acted as insulation. Voila! No chrome on that part.
So here we are, the pulley with a chromed outer face.
You can see here that in behind the inner part (That also has the clutch plate) is still rusty. I decided I'd just paint that black to dress it up a bit. The clutch plate itself will be "dressed" in the lathe by the aircon guys before they reassemble.
Lastly with any new chrome I always bathe it in oil for several days. Chrome is quite porous and has tiny holes that go through to the surface below. By soaking it in oil, the oil goes through and acts as a rust preventative on the surface below. This helps stop the chrome falling off! That's my theory anyway and so far its worked on many parts.
Here I am painting on the oil.
After resting for a few days I wiped off the surplus oil and sent the unit away to be reassembled.
Nice!
The next part will be to have the heater/aircon mounted and a condensor (radiator) for the aircon mounted, at which point I will be able to have the whole unit plumbed and run with the engine to make sure it all plugs in and goes live OK with the compressor cutting in and out as it should and fans cutting in and out as they should. The aircon guy says he can do this with compressed nitrogen as a test bed. Then I'd pull it all apart to carry on with the rest of the build. Once finalised its just a case of reconnecting everything and gassing up with the aircon refrigerant.
Before I get to that stage though I need to;
- Get my overall concept design approved by the Certification guys
- Make a fuel tank as the heater aircon unit will mount on top of that
- Get the chassis rolling properly
- Install the radiator which will mean working out the bonnet/grill
- Lay out and mount the engine wiring in such a way that a battery can be connected and the engine run without me having to be there to show them how.
- Lay out and connect up all the aircon wiring
- Map out where I want the lines to run
- Deliver the chassis to the aircon guys to do the plumbing and testing


