Below are the seats I am going to use. They are from a 5 Series BMW and are fully electric. Forward and back, front up and down, rear up and down, back of the seat tilt forward and back.....and last but not least electric headrests. Yep thats right, electric headrests!!
Just one problem with these seats though....they are way too big and bulky and sitting on these I would find it easier to drive the car looking out through the sunroof. So now I need to alter that. Firstly I take off the plastic trims.
Once they are off I can access the large screws that attach the seat back to its hinge. They are hinged so that the seat back can be tilted forward and rearward.
Once I had separated the seat back I found I had a wire to deal with. This goes from the control box in the seat base, through the hinge and up to the motor that raises and lowers the headrest.....did I tell you these seats have electric headrests!!!! In this next picture you can see the wire coming from the control box on the left, coming out of the hinge and then disappearing again, back into the seat back on the right.
I need to pull this wire out which means unplugging.....then removing the plug off the end of the wires so that it will be thin enough to thread back through the hinge.
Here is the plug, still plugged in.
Now its unplugged.
And here it is with the plug taken off the wires. It will fit through the holes in the hinge now.
Now the seat back can come away. You can see in the picture below, the headrest motor attached to the side of the seat (top of picture) and a cable coming off it. This is a flexible drive (a bendable rod if you like) inside an outer casing. The motor turns the flexible cable inside the casing and this in turn winds the headrest up and down depending on which way the motor turns.
The next step is to remove the upholstery. You can see here it hooks over some little metal claws inside the seat where you can't see when the seat is all assembled.
The upholstery is easily removed by pulling it away from these claws.
Then the whole seat cover pulls up and off the seat back. I will use this seat back frame as it is, but it will be upholstered with new materials and in a colour that matches the car of course. It will hopefully be a little less bulky than the BMW original.
Next step is to strip the seat base. Firstly I need to remove the seat base from the tracks/frame that it is attached to. There are two bolts on each side. They are in the middle of the two photo's below.
Once they were undone, the seat cushion came away from the frame with ease.
You can see there is 1 motor up under the cushion. This one controls the angle of the seat back, so in effect what it does is operates the hinges on the side of the seat. Closing the hinge angles the seat back forward and opening the hinge angles the seat backwards.
Here is a close up of that motor once the upholstery was removed.
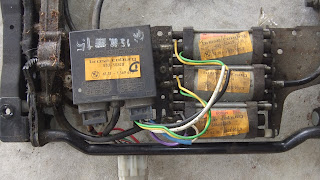
Then in the bottom of the seat you can see there is a series of 3 motors and a control box. The control box is full of relays that are controlled by a switch panel that the driver operates. The 3 motors in the base are for tilting the front of the seat base up and down, tilting the back of the seat cushion up and down and lastly for moving the seat forward and back depending on how long you are in the legs.
Here is a close up view. The control box is the square black thing and the motors all have a yellow sticker on them.
Once I had the upholstery off the seat base I was able to remove all the inner sprung framing. This is about 8 inches (200mm) thick and made for real comfy seats, but I can't have anything that thick. Every inch (25mm) I can save in thickness improves vision out of the car immensely
So I am left with this thin little frame. Much better but now I need something to add the upholstery too.
Thanks to modern cars I have been able to raid a Toyota Vitz for a couple of seats that are about to become organ donors for my BMW seats.
Here they are before I stripped them down. They are no good to me as they are manual and electrics is the name of the game here, but they do have one part that will be very useful.
So here we go again, pulling the upholstery off.
With the seat back removed and the upholstery stripped off the base, this is what we find. No thick springs here, just a very thin metal bucket that is bum shaped. I have spoken to the upholsterer and I can get away with as little as 2 inches (50mm) of foam so in total rather than sitting on a seat that is 8 inches thick I will be able to get this seat down to about 3 1/2 inches or 90mm thick. Less than half the original.
Here you can see the tin bucket removed from the Toyota frame.
And here it is added to the old BMW frame.
Next I will modify the mounts for the motors in the base and maybe some of the framework before affixing the tin bucket to become a permanent part of the seat structure. Watch for another update on this coming up.


